How to Change a Furnace Filter

The air quality inside your home plays an essential role in the health and overall well-being of you and your family. Indoor air can contain dust, dirt and mold. Air that’s free of these allergens can lead to a lower risk of respiratory illness and chronic conditions, as well as a better quality of life.
This May Also Interest You: Smart HVAC Filters: What Are They and How Do They Work?
One easy way to stay on top of your indoor air quality is by making sure the air filters in your HVAC system are replaced on a regular basis. Furthermore, replacing your air filters will also keep your heating and cooling systems running as efficiently as possible, keeping your energy bills low and your indoor air quality high.
HVAC Air Filter Replacement
Replacing your air filters is one of the simplest home improvement projects you can do. However, it’s important you know a few essential pieces of information before you get started.
For example, learning how often you should change your furnace filter is a great place to start. Typically, you should replace or clean a dirty filter every 90 days. That said, during heavy use periods when your furnace system is running often, it can be a good idea to replace your filter once a month. How often to change a furnace filter also depends on what type of air filter you’re using.
How Do You Know What Type of Replacement Filter to Buy?
When it comes to purchasing a replacement filter, there are a number of options available. The most basic version on the market is fiberglass. They trap large particles of dust and debris and should be replaced every one or two months.
A higher quality filter is the pleated paper filter. While they’re typically more expensive than fiberglass varieties, these filters trap smaller dust particles, including pollen. A high-quality pleated filter will also last much longer than a fiberglass filter and might only require replacing twice a year.
The most efficient filters available are HEPA — high-efficiency particulate air — filters. To be officially designated as a HEPA filter by the U.S. Department of Energy, it must be able to remove at least 99.97% of the airborne particles that pass through it. While more expensive, HEPA filters will keep your indoor air clean and the furnace system running as smoothly and efficiently as possible. Less common than fiberglass filters, you might have trouble locating a HEPA filter in your local hardware stores.
More Related Articles:
- Replacing Your HVAC Filter Is a Breeze! Follow These 7 Steps
- How to Clean Your AC Filter in 7 Simple Steps
- How Much Do UV Lights Cost for HVAC Systems?
- 5 Best Air Purifiers for Your Home Office
- 5 Tips for Fresher Indoor Air This Winter
How to Change a Furnace Filter
An air filter replacement is a simple task that any homeowner can accomplish. It takes roughly five to 10 minutes and can have a significant impact on the health and well-being of you and your family.
Here’s what to do:
Step 1: Cut the Power to the Furnace
Make sure that you turn off your furnace at the thermostat. This is an important step; if the furnace turns on without a filter, it can suck up loose dust and debris that might end up damaging its internal components.
Step 2: Find the Service Panel
Locate the furnace’s service panel and open or slide the door. If you can’t find it, refer to the furnace’s manual, and it should tell you where the panel is located. If you no longer have your manual, note that most air filters can be found near the air handler or in the blower compartment of your furnace. Sometimes, they can be found in a slot in the ductwork before the blower fan or in the air-uptake vent inside your home.
Step 3: Swap Out the Filter
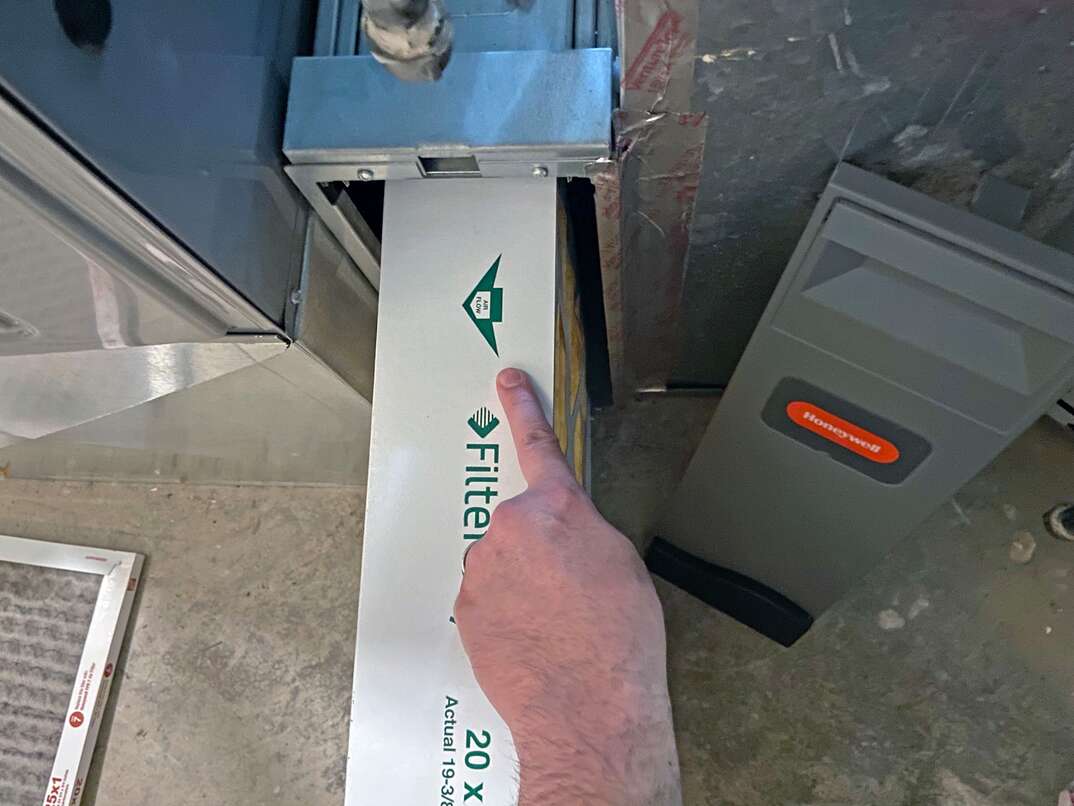
Once you locate and open the service panel, slide the filter out, but take care to note what direction the arrow is pointing on the filter frame. You’ll need to install the new filter with the arrow posted in the same direction. The arrow indicates the airflow direction on the filter, and in order for it to work properly, the arrow must be facing in the direction that the air flows. Before you remove your filter, draw an airflow direction arrow with a marker on the side of your furnace so that you don’t run the risk of installing it incorrectly. You can write the correct size filter on the side also, in case you forget.
Step 4: Replace It
Once you remove the existing filter, replace it with the new one. Again: It’s crucial that you replace the filter with one of the exact same dimensions. If not, the filter won’t be able to keep your air clean. When the filter has been replaced, turn your thermostat back on and dispose of the dirty filter.
Clean Air, Clear Mind
Your indoor air quality is extremely important. That’s why it’s crucial that you stay on top of replacing your furnace filters on a regular basis. Doing so will not only keep your indoor air clean, but will also keep your HVAC system running as smoothly and efficiently as possible, keeping those energy bills low as a result.


