How to Install a Retractable Awning

Installing a Retractable Awning at a Glance
- Tools & Materials: Measuring tape, stud finder, level, socket wrench, silicone caulking, chalk line, electric drill
- Step 1: Find studs
- Step 2: Fill locator holes
- Step 3: Install brackets
- Step 4: Mount awning hood and bar
- Step 5: Test
It can be difficult to enjoy your deck or patio when you’re dealing with blistering heat throughout the summer. The benefits of having a shaded area for you and your guests to enjoy the outdoors are considerable. Shade reduces the temperature of your space and lets you stay outside longer without prolonged exposure to the sun. As such, you might be considering installing a retractable awning to provide shade.
This May Also Interest You: How to Install a Screened-in Porch
The cost of installation is what deters many people from going ahead and buying a retractable awning. But if you’re able to do it yourself, you’ll save a lot of money while adding value and comfort to your outdoor space.
Can I Install My Own Retractable Awning?
You can save some money with a DIY retractable awning project if you’re patient and have a plan.
Things You’ll Need
Most retractable awnings come with the hardware you need for installation, but you may need to purchase additional materials. You should have the following equipment before you begin:
- Measuring tape
- Stud finder
- Level
- Socket wrench
- Silicone caulking
- Chalk line
- Electric drill
In addition to the tools and materials that you need, you should have a spotter available whenever you work on a ladder or roof. It’s also a good idea to wear long sleeves and pants while you’re working and to have gloves and protective eyewear. While you can do most of the work by yourself when installing a retractable awning, there are some steps that may be unsafe to attempt without a partner to help. Retractable awnings are also quite heavy, weighing up to 10 pounds per foot.
Location, Location, Location
Retractable awnings can be heavy, so you’re going to have to choose an appropriate installation site before you start. One of the most common mistakes people make during this stage is planning an installation in an area that has vents, lights, downspouts or other fixtures on the exterior of your home that can obstruct your awning. The area that you choose must be able to support the weight of your awning, too, so you need an area that has access to load-bearing support structures such as studs, headers or joists.
If you come up short in your search for studs that can support your awning, you can purchase angled brackets from the manufacturer that let you install a retractable awning onto your roof by mounting it into the roof trusses. Make sure that you’re patient and careful when working on the roof of your home.
More Related Articles:
- How Much Does a Screened-in Porch Cost?
- How to Install a Porch Swing
- How to Install a Paver Walkway: Follow the Steps
- How Much Does It Cost to Install a Patio?
- How to Build a Patio: 9 steps to a Backyard Paradise
How Do You Attach an Awning to a House?
Once you’ve purchased your awning, you should empty everything out of the box and take an inventory of all your materials. The manufacturer should provide all the brackets and bolts you need for your DIY retractable awning, but you might decide that you want more brackets to secure your awning if it’s a wider design. You can pick up the extra brackets and materials you need from your local hardware store.
The next step is to make sure that you’ve got all the right measurements for your awning. If you don’t perform these calculations correctly, it’s possible that you won’t have enough head clearance for people to walk underneath the awning when it’s extended. Decide how high you’d like your awning to be when it’s fully extended, and calculate the pitch using the specifications included in the manufacturer’s instructions. The total pitch added to your desired height is how high you need to install the awning to ensure adequate clearance.
Use your chalk line and a level to mark the location you need to install the awning. Then, follow these steps:
Step 1: Find Your Studs
The most effective way to be sure you’re drilling into the center of a stud is to use your stud finder to locate the stud and then drill some test holes into the stud to determine its width. The most secure place to mount a bracket is in the very center of each stud, so you want to know where the center of each stud is located. The best place for your test holes is under the chalk line. Once you find the center of the stud, mark it on the chalk.
Step 2: Fill Your Locator holes
The test holes that you drilled can invite water, mold and other debris that you’d prefer to keep out of your load-bearing structures. Use silicone caulk to fill the holes so your studs or joists are protected from water damage or decay due to the weather.
Step 3: Install the Brackets
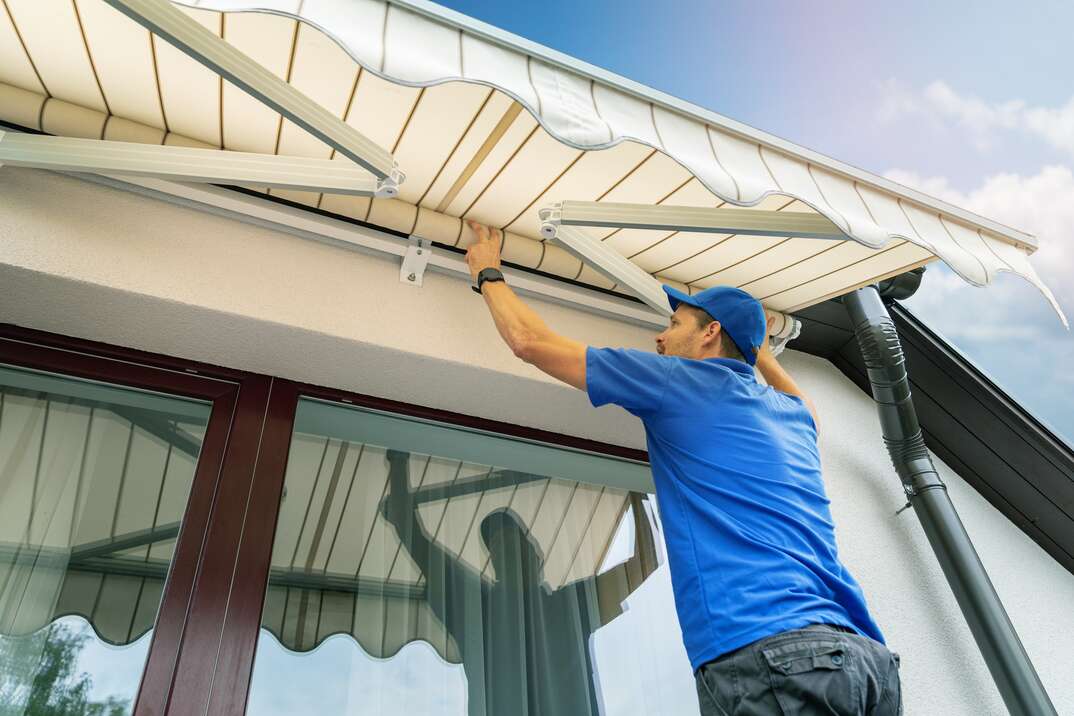
Now that you’ve got the center of each stud marked, you can install the brackets while following the instructions provided by the manufacturer. Take your time and be careful when you’re working on a ladder or roof.
Step 4: Mount the Awning Hood and Bar
The last step is to put the actual awning onto the brackets. The instructions that come with your DIY retractable awning should explain how to install the hood and bar. Use the silicone caulking to secure the hood and seal any crevices.
Step 5: Test the Awning
The last step is to make sure that your retractable awning extends and retracts properly. Check to see that you’re able to walk underneath the lowest point without hitting your head. Consider the height of others who may be walking through the area as well to be sure no one is going to be injured due to poor clearance.
How Long Does It Take to Install a Retractable Awning?
Professional installers are usually able to complete an installation in several hours, but if you're DIYing it, it will likely take longer. Spend some time planning out your project and take measurements ahead of time to ensure you can find an awning that fits.
When to Seek a Professional
Some two-story homes make it more difficult for the average DIYer to install a retractable awning. You may need to use the joist between the first and second story to mount the brackets instead of finding studs. If you’re unsure of whether you can safely install a retractable awning, it may be a better idea to have someone else do the job for you.


