How to Install a Garbage Disposal
Not only does your garbage disposal make mealtime cleanup go a little easier, but it can also be a boon to your home's plumbing system and the environment as well. By grinding up food waste into super small particles instead of sending them down the drain, garbage disposals make your pipes less likely to clog. And by scraping your food scraps into the sink and effectively liquefying them, you keep them out of landfills where, if they get buried, they won't decompose properly.
More Related Articles: 8 Things You Should Never Put Down the Garbage Disposal (and 5 Things You Can)
If you have a garbage disposal that needs to be replaced, or if you have a sink that's never had a disposal installed, you might be encouraged to know that putting in a new one is a fairly simple operation. Here's how.
Installing a Garbage Disposal: 10 Steps
Step 1: Handle the Power Situation
All garbage disposals require a source of electricity to function correctly. If you are replacing an old disposal, this isn't a concern, as it would have needed a power source before its initial installation. If you are installing a disposal from scratch, though, check to see if you have an outlet beneath the sink that is controlled with a switch. If not, you will likely need to call an electrician to run the proper receptacle or to help you hardwire your disposal to your home's electrical system and install a switch for correct operation.
If power is present under the sink, be sure to turn off the circuit breaker that is connected to it before starting the project to limit the risk of danger. If the old disposal was a plug-in model, unplug it now. If it was hardwired, we'll deal with that shortly.
Step 2: Remove the Old Disposal
If this is a new garbage disposal installation, you can skip to the next step. If you need to replace a garbage disposal, however, you still want to begin by turning off the breaker. To ensure the power is indeed cut, you can place a voltage detector on the wire and check to see that it shows no current.
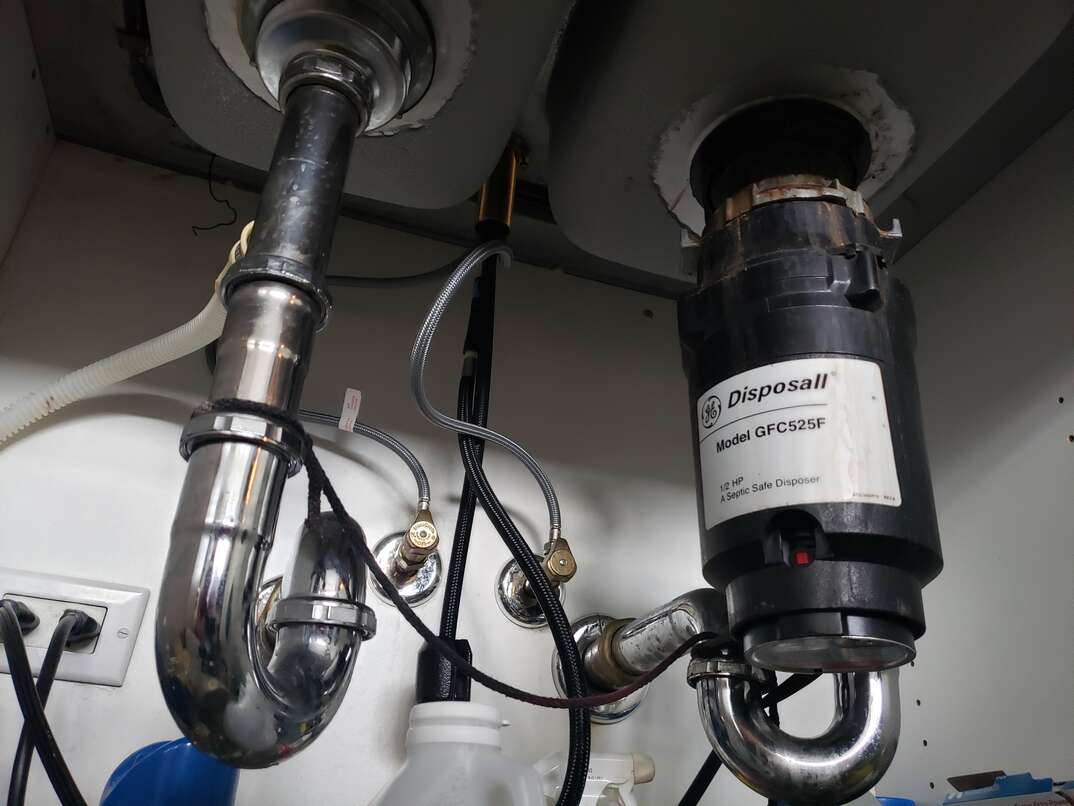
Next, look for the thick black pipe coming out of one side of the disposal. This is usually an elbow-shaped joint that goes into the sink's drain pipe. Unscrew the nut to break the connection and wiggle the fitting off. Keep a dishpan or old rag handy to catch any water that might still be in the drain.
If your system has a dishwasher attachment, you'll find it at the top of the disposal. It's a smaller tube and can be taken off by loosening the hose clamp that keeps it in place.
To get the old disposal off, insert the small wrench that came with the disposal into one of the loops on the collar that holds the disposal to the mounting bracket (or just use a screwdriver). Turn clockwise to release. Once the collar is unscrewed all the way, the disposal will drop off. As an extra precaution and to keep you from damaging the bottom of your cabinet, you may want to have some kind of support beneath the disposal, like a box or a yoga block, so that it doesn't have far to fall.
If your old disposal was a plug-in model and you unplugged it earlier, you are good to proceed with getting rid of it and installing your new one. If it was hardwired, however, you’ll need to remove the small plate on the bottom of the disposal, pull the wires out, unscrew the wire nuts and disconnect the wires. Then, remove the ground wire that may be attached to an internal screw. Then separate the wires, loosen the strain release clamp that holds the main wire inside the disposal and remove the disposal from beneath the sink.
More Related Articles:
- How to Remove a Garbage Disposal
- How Much Does It Cost to Install a Garbage Disposal?
- How to Reset Your Garbage Disposal (Pssst … It’s Way Easy!)
- Garbage Disposal Not Working? Here’s How to Fix Common Issues
- How Much Does It Cost to Install or Replace a Sink Drain?
Step 3: Remove the Sink Drain Flange
If you are replacing an old disposal, you may be able to leave the drain mounting bracket in place if your new model is compatible. If not, you'll need to remove it. If this is a new install, you'll need to remove the sink's existing drain flange. Do so by removing the necessary nuts that connect the drain flange to the drain from beneath the sink. Then, tap it out and clean away any old plumber's putty left behind.
Step 4: Install the New Flange
Your new disposal will come with a new drain flange. Install it by wrapping a small rope of plumbers putty (about a half-inch thick) around the lower edge and pressing it into place from above. Put a towel over the drain from the topside of the sink and weigh it down using something heavy like a pile of books or your new (or old) disposal.
Step 5: Install the Mounting Bracket
Working from beneath the sink, slide the gasket and mounting bracket over the bottom of the sink flange and hold it in place using the mounting ring. Then, tighten the screws to secure the bracket. Remove the towel from the top of the sink and scrape away any plumber's putty that oozed out.
Note: Some disposals now come with an easy-mount system. This allows you to simply screw a mounting ring in place. Follow the instructions that came with your disposal for clarity.
Step 6: Wire the New Disposal (if Necessary)
If your disposal is a hardwired model, remove the small metal panel on the bottom and connect the wires that match the wires coming from your home. Cap each connection with a wire nut turned clockwise. Again, follow the instructions that come with your disposal to make sure you do this part of the process properly. Replace the small panel.
Step 7: Prepare the New Disposal
If your kitchen drain system includes a line from your dishwasher, then take a moment to knock out the round plug at the top of the disposal and retrieve it from within the disposal. You can do this using a screwdriver and light hammer. If you don't have a dishwasher, leave the plug in place.
Step 8: Hang the New Disposal
Attach the new disposal to the mounting bracket you installed in Step 5, and turn the locking ring counterclockwise until it is tight and secure. Sometimes, the disposal will come with a tool to accomplish this step. Otherwise, you can simply use a screwdriver.
Step 9: Reattach the Pipes
Be sure to attach the dishwasher drain to the top of the disposal (if you have one) and secure with a hose clamp. Install the main drain line to the side of the disposal and secure with a locking nut.
Step 10: Turn the Power Back on and Test
At this point, all that's left to do is make sure you did everything right!
Turn the breaker back on and run some water down the drain containing the disposal. Keep the water running and turn the disposal on using the switch. Look under the sink to be sure there are no leaks. If there are, you may need to tighten some of your connections. If not, you're all set to start enjoying the benefits a garbage disposal can add to any home.