How to Install Roof Shingles
Installing Roof Shingles at a Glance
- Tools and materials: Shingle nails, drip edge, underlayment, staple gun, starter strip, shingles, harness/scaffolding
- Step 1: Prepare deck
- Step 2: Install drip edge and ice dam protection
- Step 3: Add underlayment and flashing
- Step 4: Lay starter strip
- Step 5: Shingle roof
- Step 6: Add hip and ridge caps
Shingling a roof is no small job. It can be difficult to lay shingles properly to avoid leaks in your roof. There’s also the added risk of falling from a significant height. For these reasons, shingling is usually the job of a professional. However, if you have access to the proper tools and can take the necessary safety precautions, it's possible to make a DIY project out of shingling a roof.
This May Also Interest You: How Much Do Roof Shingles Cost?
Here’s everything you need to know about the process.
Equipment and Safety
Before you start, it's essential to put the property safety measures in place. Working from a height presents many hazards, primarily the risk of a fall. Depending on the height and pitch of the roof you're working on, you may want to consider securing yourself with a harness.
Before you begin, gather these materials:
- Shingle nails
- Drip edge
- Ice and water protection and/or underlayment of your choosing
- Staple gun
- Measuring tape
- Starter strip
- Roof shingles
- Chalk line
- Pencil
- Hammer or nail gun
- Harness or scaffolding
How to Shingle a Roof
1. Prepare the Deck
To create a durable shingle roof, you need to start with a smooth, secure deck. Ensure that it's fastened to the trusses correctly, has no gaps and is completely dry. If your deck is comprised of wooden boards, some shingle manufacturers may recommend sheeting over it with plywood.
2. Install the Drip Edge
Start at the bottom and install a drip edge. This a sharp metal edge that protects the roof deck from rot and water damage.
3. Install Ice Dam Protection
If you live in an area with cold, wet winters, this layer will help your roof last longer. It’s also required by some regional building codes. Ice dam protection is a thin, adhesive layer installed on the roof deck over the drip edge. The protective layer should have an ¼- to ¾-inch overhang past the eaves.
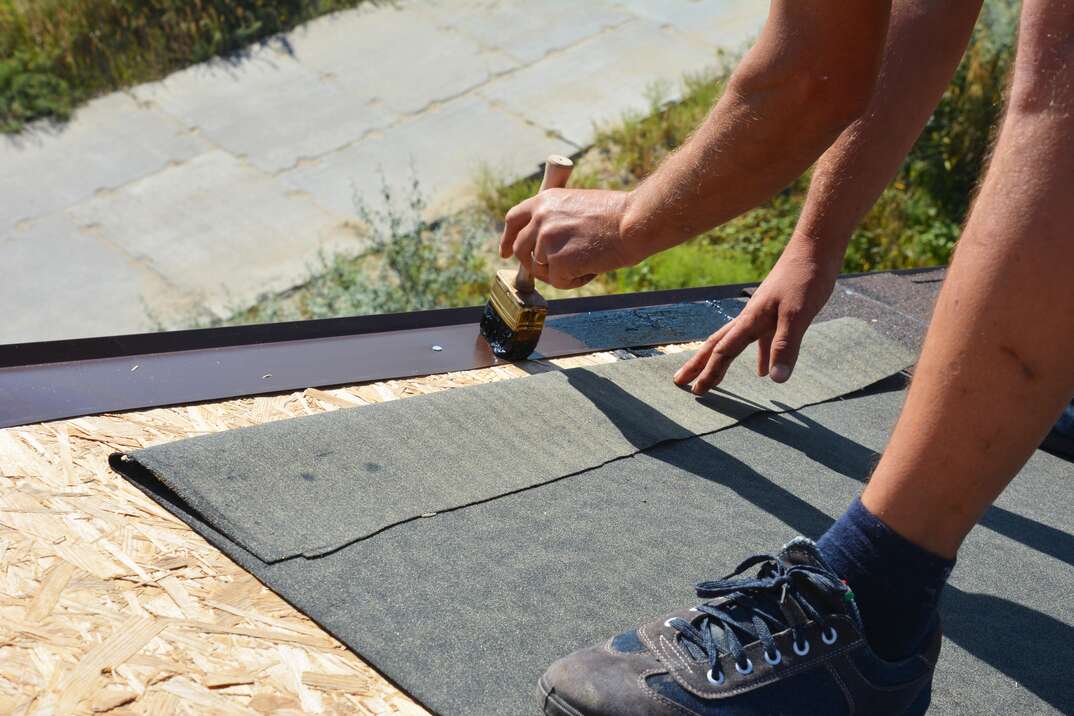
4. Add the Underlayment
The underlayment can either be synthetic or made of asphalt-saturated felt. If you live in a warm climate, building codes may permit you to skip the previous step and go straight to the underlayment, ensuring that it has a ¼- to ¾-inch overhang past the edge of the eaves.
5. Joint and Valley Flashing
If water penetrates the shingle layer of the roof, you'll need to add flashing to the points where water could potentially leak into your home. If your roof has open valleys, you can line them with corrosion-resistant metal at this time. Closed valleys can be addressed during the shingle application process.
When you're installing metal flashing, remember that each piece should overlap the one below it by roughly 3 inches. Using asphaltic plastic cement, secure the flashing in place and nail it.
6. Lay the Starter Strip
A starter strip is an extra layer of shingles at the edge of the roof. Purchase this in the same color as what you're choosing for your main field shingles. You can also buy 3-tab shingles and use several of them to create the strip.
Take the starter strip and turn it upside down so that the shingles are facing up — or what you would see as the “wrong direction.” Place this over the underlayment. When you start installing the rest of the shingles, this strip will provide a perfect double layer of protection on the edge.
Once the starter strip is installed, it should hang roughly 1/4 inch past the drip edge. Using your chalk line, mark the location in a straight line across the underlayment where you want the top of the starter strip to sit to achieve the correct overhang. Lay the strip and nail it down. Your nails should go into the tar strip. Add the second layer of shingles on top.
7. Shingle the Roof
Next, you can begin laying down the main roof shingles. You'll work from the bottom up, starting from where you left off with the strip of shingles at the edge of the roof. Each row of shingles must be staggered for the proper look and protection. Using the seams of the shingles from the row below as a reference, ensure the row above does not have a joint within 6 inches of the one below.
To achieve this, you'll cut roughly 6 to 8 inches off the first shingle for each row as you work up the roof. Eventually, your starter shingle will be very small, and the next row can be a full-length shingle again. This will ensure you achieve the desired staggered pattern all the way up.
For laminate shingles, hammer your nails into the tar strip. The size of your shingles will determine how many nails you need to secure each one.
8. Hip and Ridge Capping
Now that you've got your field shingles secured all the way up the roof, you can finish off the peak with hip and ridge caps. Ridge cap shingles will straddle the peak of the roof to properly deflect water. You should begin on the side of the roof that is opposite to the direction of prevailing winds. These pieces overlap, much like the rest of the shingles, with the final piece nailed in place.
You will need longer nails to secure ridge caps because the nails will also need to penetrate the field shingles below.
More Related Articles:
- Extending the Life of Your Roof in 3 Easy Steps
- Everything You Need to Know About Gutters
- How Much Does It Cost to Repair a Leaky Roof?
- How Much Does It Cost to Clean Gutters?
- Overhead Expenses: A Leaky Roof Doesn’t Have to Mean Pricey Repairs
FAQs
Do You Need Underlay for Roof Shingles?
Yes. You must put down an underlay for your roof shingles before you begin. Underlay should be rolled out in strips to cover the entirety of the roof. In colder climates, you may also need to lay down ice and water protection below the underlayment.
Do You Remove the Plastic Strip on Shingles?
Most manufacturers recommend that you do not remove the plastic strip on the back of your shingles. This remains true before and after installation.
Is It Difficult to Shingle a Roof?
Shingling a roof takes skill and attention to detail. Depending on the size and pitch of your roof, it can be a lengthy and labor-intensive process. If you’re prepared with the right equipment, it can be a seamless process. If you aren’t confident in your skills, however, it’s best to call a professional.
How Far Do You Overhang Shingles?
Shingles should overhang your roof by 1 to 1 ½ inches.
How Do You Stagger Shingles?
Staggering shingles is easier than it sounds. You'll want to reduce the length of the first shingle for each row by 6 to 8 inches to provide the proper joint offset all the way across. Once your starter shingle is only 6 to 8 inches long, you can return to a full-length shingle on the next row.
Since we’re all home now more than ever, being prepared for unexpected home repairs with a plan from HomeServe is important. Having a plan in place gives you peace of mind knowing that you can simply call our 24/7 repair hotline for covered breakdowns. See what plans are available in your neighborhood.